Goal:
setup the RPi’s software and hardware to create a minimal selfie station. Utilizing node-red, and a few components like the RPi camera and the led ring.
What you will learn:
Advanced node-red usage, using hardware with node-red, how to use the camera node.
What you will need:
RPi with node-red, RPi camera, button, and LED ring.

![]()
Introduction:
We will create a node-red flow to take selfies and display them right on the raspberry-pi desktop, using the LED-ring as a flash. To achieve this we will need to go through several steps: activate the LED-ring, take a picture, and open it on the desktop. But first we need to wire up the hardware.
Wiring:
- Connect the red LED ring wire to the 5v pin
- Connect the black LED ring wire to a GND pin
- Connect the white LED ring signal line to pin 12 – #18
- Use a jumper wire to connect the VCC pin of the button to 3v pin
- Use a jumper wire to connect the OUT pin of the button to pin 32 – #12
- Use a jumper wire to connect the GND pin of the button to GND pin


Setting up Node-Red:
start node-red, and navigate to 127.0.0.1:1880. (or use the node-red shortcut in your browser)
Drag in a rpi gpio pin and hook it up to a debug node.

To configure the GPIO node, set the pin to GPIO: 12
You can also name the node ‘button’ to remind you later.
This assigns the GPIO node you just dragged in to monitor the same pin you wired the button too.

Now that we have the button configured, we can test it out. If you deploy the current flow you should be able to see output in the debug tab whenever you press the button. 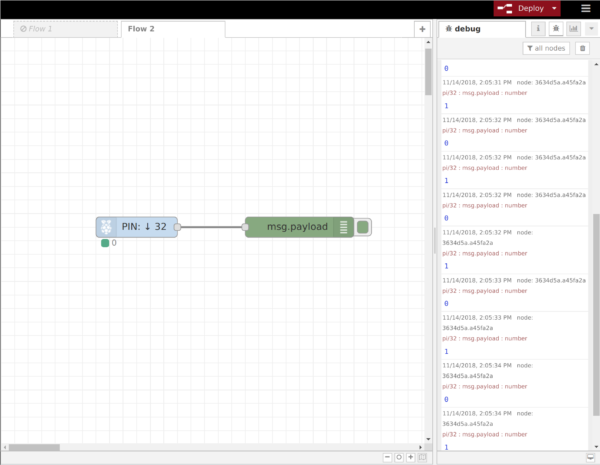
Next we want to setup the flash ring, the led-ring is controlled by a neopixels node, so drag one of those in.
The only Setting that needs to set for this is the number of led in string, usually this should be 12.
You can rename this node to led-ring in the same menu.
Reading the led-ring help dialog, we find that it doesn’t just take a generic ‘injection’ to turn it on; but a more complicated command that it reads.
For example: ‘1,12,0,255,0’ sets the entire ring red.
Broken down, this command means: ‘set leds #1 through #12 to the color ‘0,255,0’. This color can further be broken down into ‘Red: 0, Green: 255, Blue: 0′
So if you use a generic ‘inject’ node into the led-ring node, you can light it up red with this string.

For the actual flash a flashing, multicolored timer, followed by a white flash is ideal, to do this we use timing nodes combined with change nodes.
You can find the yellow change-node in the node palette to the left.
The change nodes we will use look like this, they take an input; change the payload and then send it out.

For the flashing effect the nodes will have to be chained like this, with a delay node.

You can copy and paste the change node from earlier, and then go in and change the color code it sends.
This chain can be continued down the line; don’t forget that the color code for white is: 255,255,255.

One annoying quirk of the GPIO node, is that it sends a message when you press the button down and when released; so you could trigger this entire flow twice if you held the button down for a noticeable amount of time. The easiest way to solve this is to stick a delay/rate-limit node after the GPIO node, like this.
A good default is 1 message per 5 seconds.
To do this, setup a ‘delay’ node with these settings, hooked just after the GPIO node.
Make sure to select ‘drop intermediate messages’


Next we need to setup the camera node, make sure the camera is plugged into the camera port on the raspi.

Watch out for the orientation of the blue side of the connector, it should point towards the USB connectors.
You can setup the camera node like this:
The Image Resolution needs to changed from the default so the camera will take pictures.
 The input wire activates the camera, and the output wire sends the filename when its done taking a picture.
Seeing as the camera sends a message when its finished taking a picture, we can use this to turn off the flash at exactly the right time.
When you copy and paste another change-node, set the color to ‘0,0,0’ to turn the led-ring off.
You can use a debug node to check the filename the camera is outputting too.

The final, and most arcane step is to open the image in a image-viewer. This is done with an ‘exec’ node you can drag in.
Remember you can search in the node-palette to find whatever node you’re looking for.
You can copy all these settings in, and hook it up to the ‘take photo node’
The Command is:
DISPLAY=:0.0 gpicview
And then check the ‘Append msg.payload’ checkbox, and put an ‘&’ in the append entry.
The output and name options aren’t required, they just make the flow more readable.

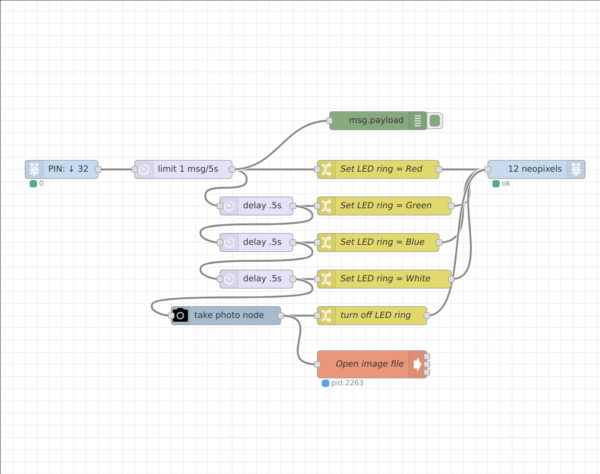
Leaving you with a hopefully functional flow that looks like this.
If you are a teacher and need a working demo of this project, you can download the image here: https://t3alliance.org/wp-content/uploads/2018/11/selfieImage.zip
Shortcuts:
if you get stuck in this tutorial, feel free to import the entire flow from here:
[{"id":"549d128c.d1e48c","type":"tab","label":"Flow 2","disabled":false,"info":""},{"id":"7a6088da.6f3e38","type":"camerapi-takephoto","z":"549d128c.d1e48c","filemode":"2","filename":"","filedefpath":"1","filepath":"","fileformat":"jpeg","resolution":"9","rotation":"0","fliph":"0","flipv":"0","brightness":"50","contrast":"0","sharpness":"0","quality":"80","imageeffect":"none","exposuremode":"auto","iso":"0","agcwait":"1.0","led":"0","awb":"auto","name":"","x":670,"y":520,"wires":[["226fa57f.d594ca","65312393.72d7ec"]]},{"id":"65312393.72d7ec","type":"exec","z":"549d128c.d1e48c","command":"DISPLAY=:0.0 gpicview","addpay":true,"append":"&","useSpawn":"false","timer":"","oldrc":false,"name":"Open image file","x":910,"y":600,"wires":[[],[],[]]},{"id":"226fa57f.d594ca","type":"change","z":"549d128c.d1e48c","name":"turn off LED ring","rules":[{"t":"set","p":"payload","pt":"msg","to":"0,12,0,0,0","tot":"str"}],"action":"","property":"","from":"","to":"","reg":false,"x":910,"y":520,"wires":[["e70bf46d.3df5b8"]]},{"id":"e01059e8.526678","type":"delay","z":"549d128c.d1e48c","name":"","pauseType":"delay","timeout":".5","timeoutUnits":"seconds","rate":"1","nbRateUnits":"1","rateUnits":"second","randomFirst":"1","randomLast":"5","randomUnits":"seconds","drop":false,"x":720,"y":340,"wires":[["2b05a1af.2d162e","4a634559.5bed0c"]]},{"id":"1c398bbd.6ff2c4","type":"change","z":"549d128c.d1e48c","name":"Set LED ring = Red","rules":[{"t":"set","p":"payload","pt":"msg","to":"1,12,0,255,0","tot":"str"}],"action":"","property":"","from":"","to":"","reg":false,"x":920,"y":280,"wires":[["e70bf46d.3df5b8"]]},{"id":"2b05a1af.2d162e","type":"change","z":"549d128c.d1e48c","name":"Set LED ring = Green","rules":[{"t":"set","p":"payload","pt":"msg","to":"0,12,255,0,0","tot":"str"}],"action":"","property":"","from":"","to":"","reg":false,"x":930,"y":340,"wires":[["e70bf46d.3df5b8"]]},{"id":"cd35bff4.45e72","type":"change","z":"549d128c.d1e48c","name":"Set LED ring = Blue","rules":[{"t":"set","p":"payload","pt":"msg","to":"0,12,0,0,255","tot":"str"}],"action":"","property":"","from":"","to":"","reg":false,"x":920,"y":400,"wires":[["e70bf46d.3df5b8"]]},{"id":"4a634559.5bed0c","type":"delay","z":"549d128c.d1e48c","name":"","pauseType":"delay","timeout":".5","timeoutUnits":"seconds","rate":"1","nbRateUnits":"1","rateUnits":"second","randomFirst":"1","randomLast":"5","randomUnits":"seconds","drop":false,"x":720,"y":400,"wires":[["cd35bff4.45e72","d6b433a.088ced"]]},{"id":"db82b2b9.cc94a","type":"change","z":"549d128c.d1e48c","name":"Set LED ring = White","rules":[{"t":"set","p":"payload","pt":"msg","to":"0,12,255,255,255","tot":"str"}],"action":"","property":"","from":"","to":"","reg":false,"x":930,"y":460,"wires":[["e70bf46d.3df5b8"]]},{"id":"d6b433a.088ced","type":"delay","z":"549d128c.d1e48c","name":"","pauseType":"delay","timeout":".5","timeoutUnits":"seconds","rate":"1","nbRateUnits":"1","rateUnits":"second","randomFirst":"1","randomLast":"5","randomUnits":"seconds","drop":false,"x":720,"y":460,"wires":[["db82b2b9.cc94a","7a6088da.6f3e38"]]},{"id":"8c366b7d.3c3f18","type":"rpi-gpio in","z":"549d128c.d1e48c","name":"","pin":"32","intype":"down","debounce":"25","read":false,"x":400,"y":280,"wires":[["655eb18c.06cca"]]},{"id":"e70bf46d.3df5b8","type":"rpi-neopixels","z":"549d128c.d1e48c","name":"","pixels":"12","bgnd":"","fgnd":"","wipe":"40","mode":"pcent","rgb":"rgb","brightness":"100","gamma":true,"x":1180,"y":280,"wires":[]},{"id":"655eb18c.06cca","type":"delay","z":"549d128c.d1e48c","name":"","pauseType":"rate","timeout":"5","timeoutUnits":"seconds","rate":"1","nbRateUnits":"5","rateUnits":"second","randomFirst":"1","randomLast":"5","randomUnits":"seconds","drop":true,"x":600,"y":280,"wires":[["e01059e8.526678","1c398bbd.6ff2c4","4c17564c.dcd4c8"]]},{"id":"4c17564c.dcd4c8","type":"debug","z":"549d128c.d1e48c","name":"","active":true,"tosidebar":true,"console":false,"tostatus":false,"complete":"false","x":920,"y":200,"wires":[]}]