This tutorial is being worked on – the google photos node may not be working at this time due to changes in the underlying repositories.
Goal:

Upload pictures from a node-red flow into a Google Photos folder.
What you will learn:
How to install and configure the easybotics-gphoto-upload node, and use it in your flow.
What you need to know:
Parts List:
- A raspberry pi setup with node-red
- Raspberry pi camera
Getting Started:
- First connect your camera to your raspberry pi while the power is off.
- Power on your raspberry pi and make sure the camera is enabled in the configuration menu.
- If it is not already installed you need to install the gphoto-upload node, because of some peculiarities with dependencies this node has to be installed manually, the procedure follows:
Copy and paste, or type these lines into a terminal window. If typing press enter after each line, if pasting in the whole block you should only need to press enter once.
cd ~/.node-red
sudo node-red-stop
sudo npm i node-red-contrib-easybotics-gphoto-upload
sudo npm i axios@^0.16.2
Then once that install is done(1-5min) copy and paste/type this line and press enter
sudo npm i axios@^0.16.2
Wait for this install to finish(1-5min)
Restart Node Red – you could type Start Node-Red into the terminal or click on the node red program link
Open a web browser and view 127.0.0.1:1880 – If you already had the web browser open refresh the node red page.
Node usage:
Drag the upload-photo node in from the palette, and enter the setup menu by double clicking on it.
It’s definitely a good idea to setup an entirely separate google account for use with node-red, rather than pasting your actual username and password into nodes; no matter how trusted.
To allow node-red to login to gphotos without two factor authentication, you must setup unsecured access here: https://support.google.com/accounts/answer/6010255
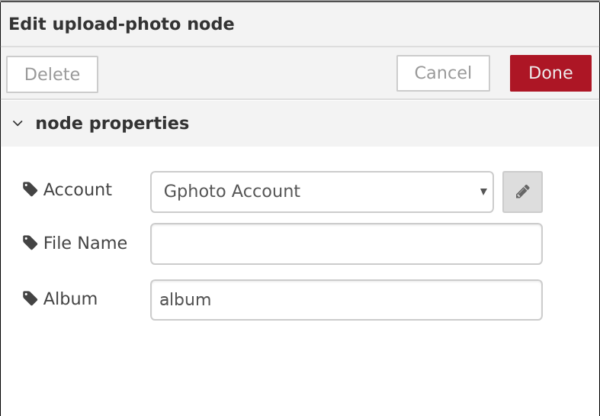

In the settings page, the filename and album can be set. Usually you would inject a filename, but if you inject an empty message it takes the defaults set here.

To setup the camera node, just make sure it’s set to output the filename.
And that the Image Resolution is set to anything other than the maximum.

Notes:
If you take pictures at the rate of once every 2 minutes here are the days you can expect before the 8GB of free space on the SD card is filled up:
Quality = 80
- 2592×1944 – 2.7MB per photo = 3.5 days
- 1920×1080 – 1.2MB per photo = 7 days
- 1024×768 – 546KB per photo = 17 days
- 320×240 – 96KB per photo = 98 days
If you need more space to keep the SD card from filling up quickly a larger 64, 128, or even 256GB card will store many more photos before filling up – do some math to figure out how many photos each can hold.